

Irresistible Mini Macaroni and Cheese Bites: Your Ultimate Guide
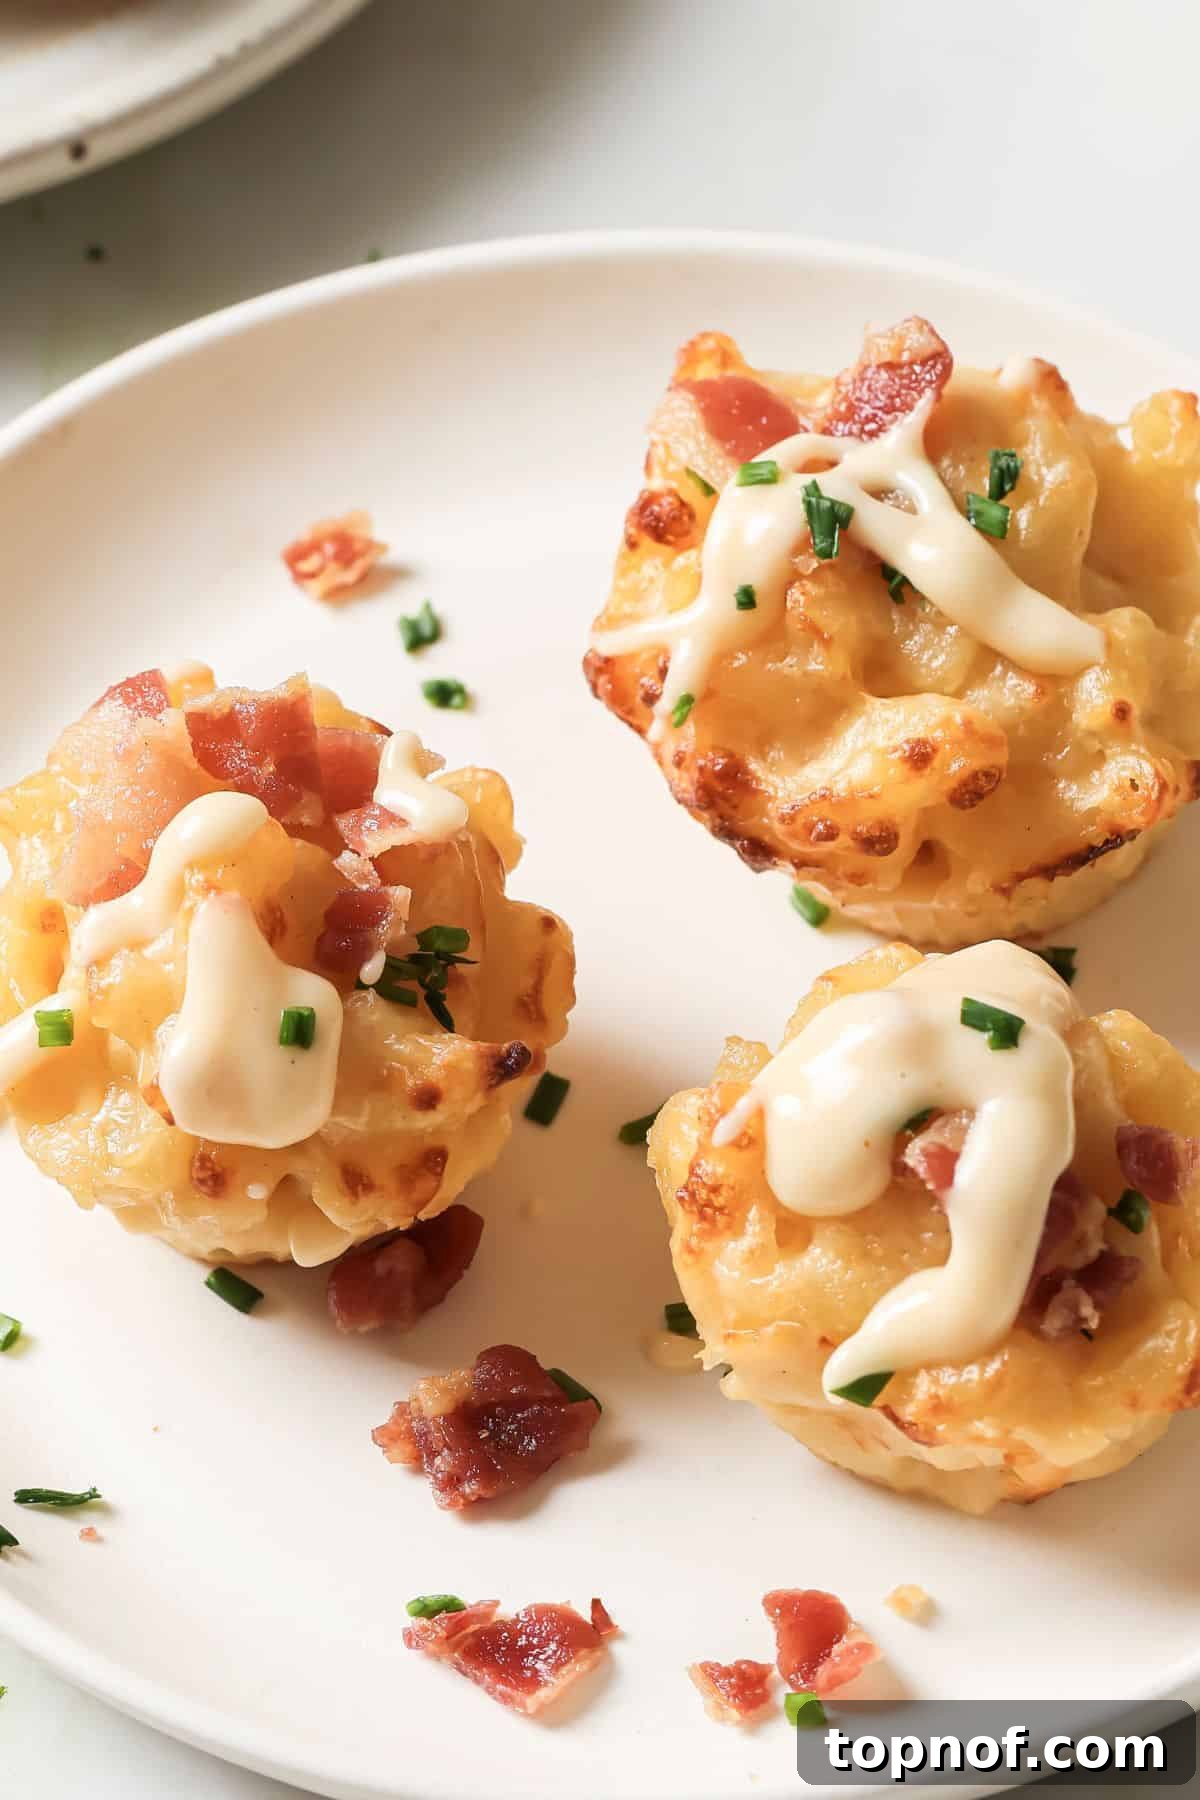
Get ready to elevate your comfort food game with these truly irresistible mini macaroni and cheese bites! Perfectly portioned, delightfully crispy on the outside, and incredibly creamy on the inside, these baked mac and cheese cups are more than just a snack – they’re a sensation. Whether you’re hosting a lively gathering, looking for a unique appetizer, or simply want a fun side dish that vanishes in minutes, these cheesy morsels are guaranteed to be a hit. Say goodbye to leftovers and hello to your new favorite way to enjoy classic macaroni and cheese!
Why You’ll Love These Mini Mac and Cheese Cups
There are countless reasons why these baked macaroni cups become an instant favorite, not just for you but for everyone who tries them. They’re not only incredibly fun to make but even more enjoyable to eat. In my experience, a batch of these vanishes almost as soon as they emerge from the oven – seriously, expect zero leftovers!
- Effortless Elegance for Any Event: From casual game days and festive holiday parties to cozy family dinners or sophisticated potlucks, these mini mac and cheese bites seamlessly fit any occasion. Their charming presentation makes them an elegant addition without any extra effort, ensuring they’re always the first to be devoured.
- Perfectly Portable & Bite-Sized Bliss: Forget the forks and messy plates! These individual cups are designed for ultimate convenience. Each bite offers a delightful explosion of flavor and texture, making them the ideal grab-and-go snack or appetizer. They’re mess-free and kid-friendly, making them perfect for little hands too.
- Your Make-Ahead Marvel: Planning a party or just a busy week? These mini mac and cheese cups are your best friend. You can prepare them in advance, store them, and simply pop them into the oven when you’re ready to serve. This fantastic make-ahead capability saves you precious time, allowing you to enjoy your guests or a relaxed evening.
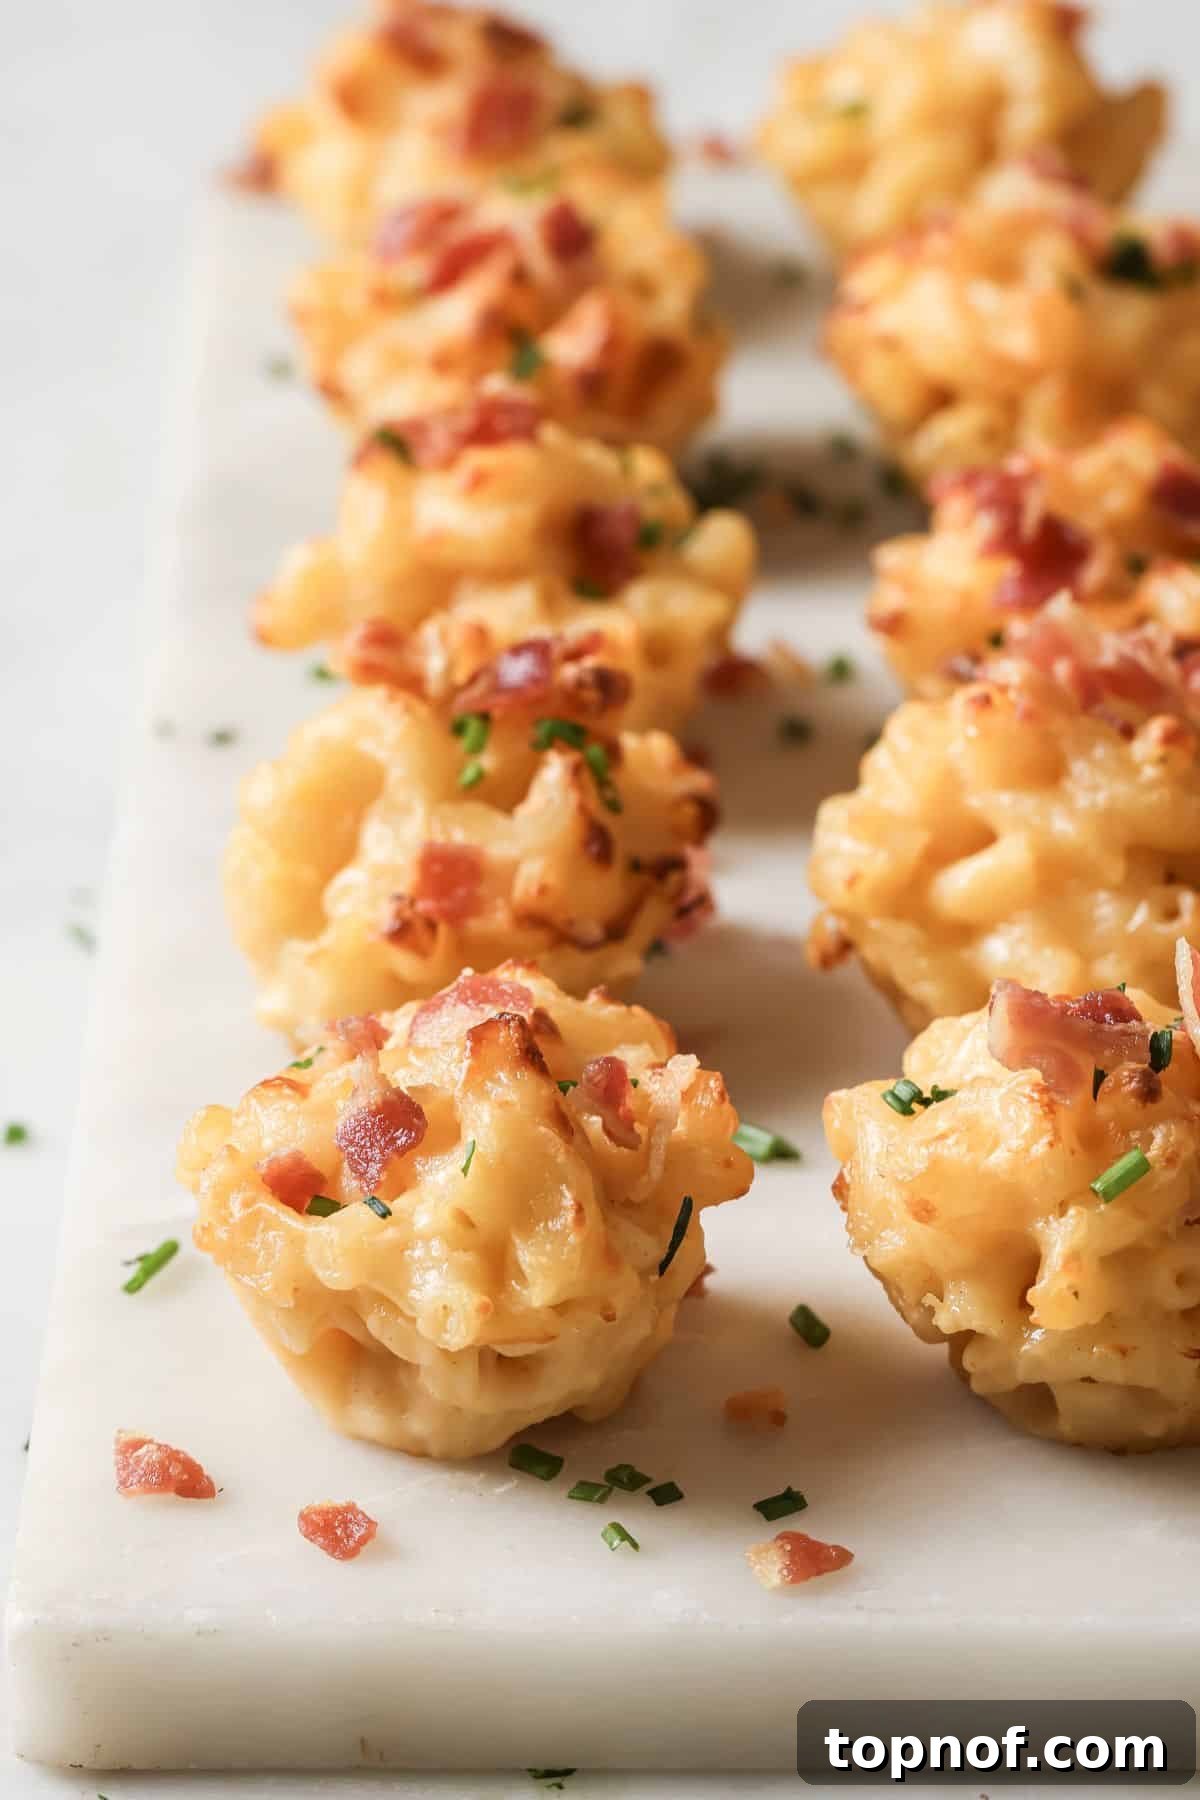
- Crispy, Creamy, Irresistible: The baking process gives these cups a golden, slightly crispy exterior while maintaining a lusciously creamy and gooey interior. This delightful contrast in texture, combined with the rich cheesy flavor, makes them truly irresistible and leaves everyone craving more.
Essential Ingredients for the Perfect Mini Mac
Crafting the perfect mini mac and cheese bites begins with selecting quality ingredients. Here’s a closer look at what you’ll need and some clever substitutions to suit your pantry and preferences:
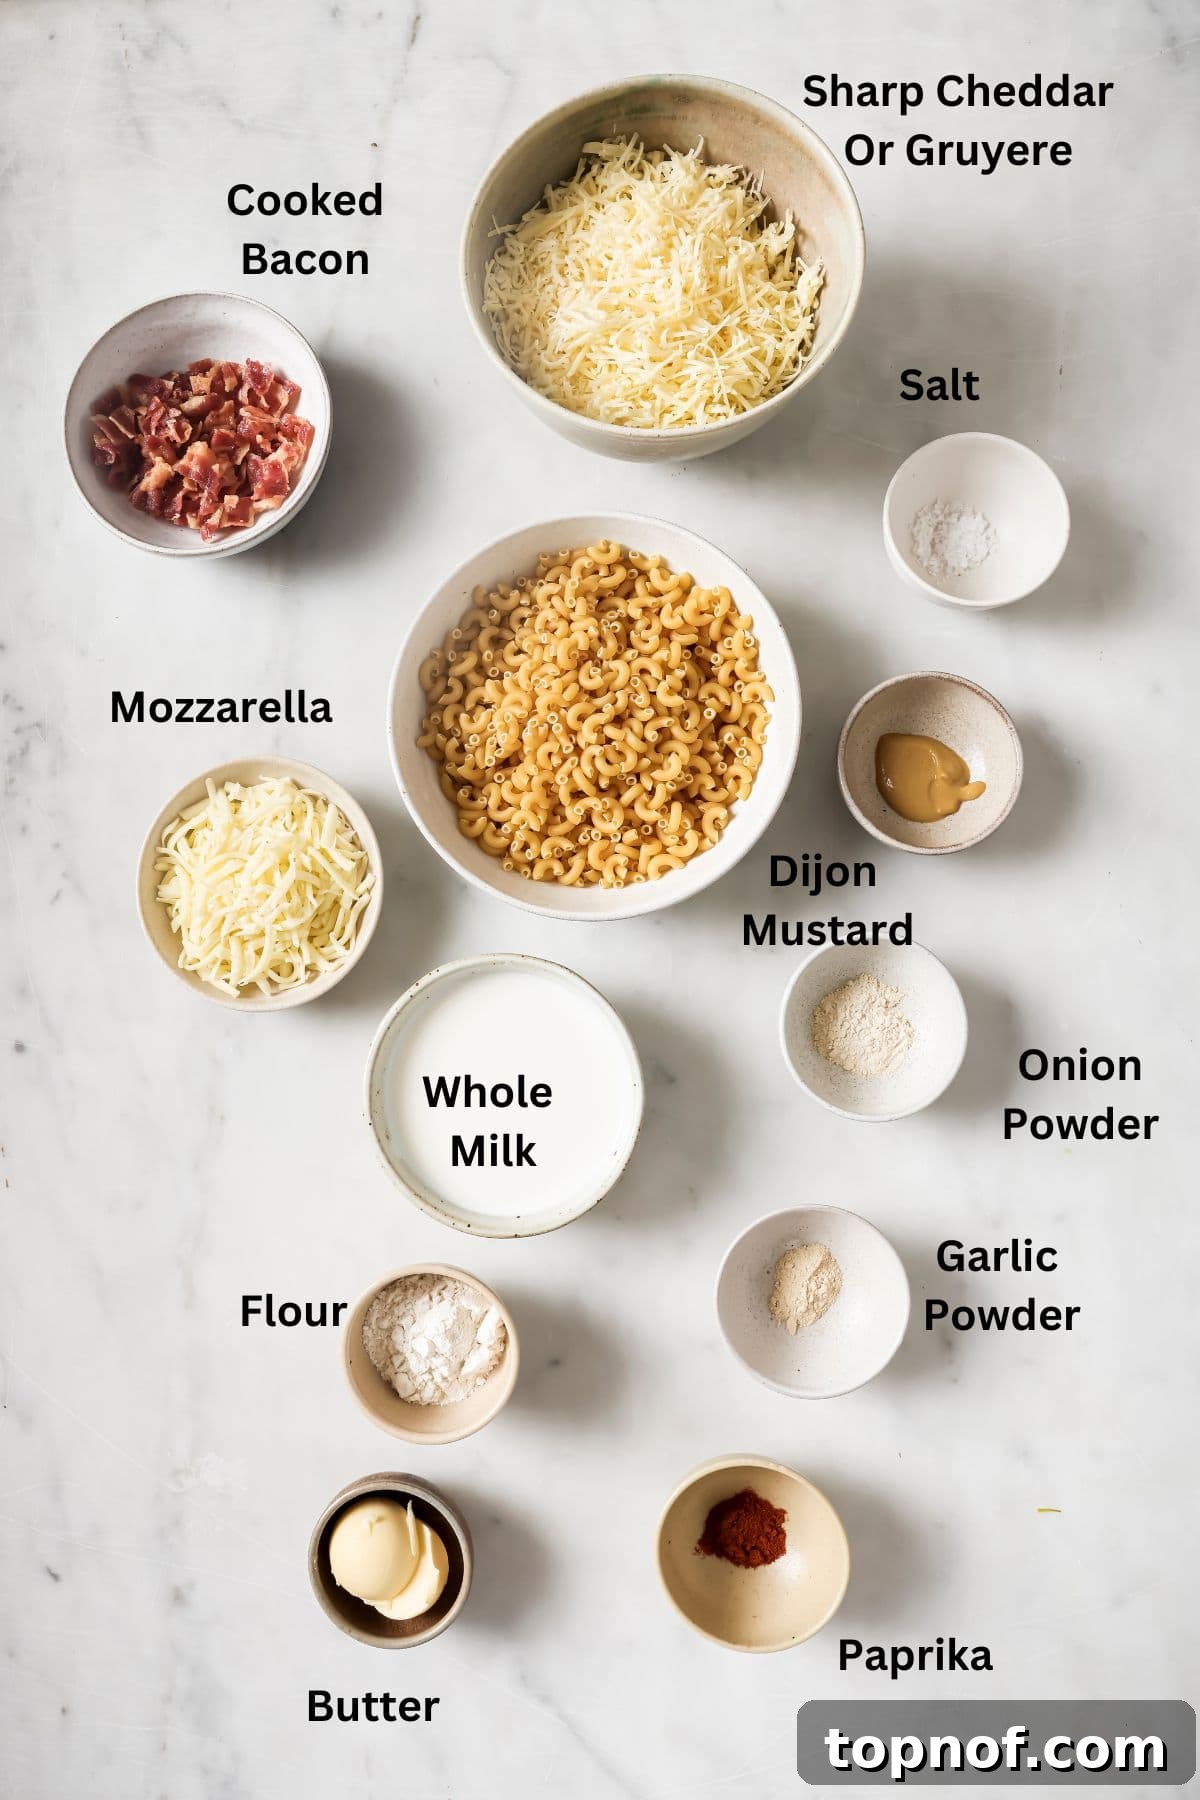
You’ll find the complete list of ingredients and precise measurements in the detailed recipe card further down this post.
- Elbow Macaroni: The quintessential choice for classic mac and cheese, its small, curved shape is ideal for holding onto that rich, creamy sauce. For a fun twist, feel free to experiment with other small pasta shapes like ditalini, small shells, or even mini penne. Just ensure they are small enough to fit neatly into your muffin cups.
- Whole Milk: This is the secret to an extra rich and creamy cheese sauce. The higher fat content contributes to a smoother, more luxurious texture. If you’re aiming for a slightly lighter version, 2% milk can work, though it might result in a slightly less decadent sauce. For an ultra-creamy, restaurant-quality experience, consider using half-and-half or even a splash of heavy cream.
- Unsalted Butter: Using unsalted butter gives you precise control over the overall saltiness of your dish. If all you have is salted butter, that’s perfectly fine; just remember to taste and adjust the amount of added salt in the recipe accordingly to avoid over-seasoning.
- All-Purpose Flour: Flour is crucial for creating the roux, the base that thickens our cheese sauce. For those with gluten sensitivities or dietary restrictions, a good quality gluten-free all-purpose flour blend can be used as a direct substitute without compromising on texture.
- The Cheese Blend: A combination of cheeses is key to a complex flavor profile and superior melt. We recommend a duo of mozzarella and sharp cheddar cheese. Mozzarella offers that coveted gooey, stretchy texture, while sharp cheddar brings a robust, tangy flavor. For a gourmet touch, consider substituting sharp cheddar with Gruyère cheese, known for its nutty, rich, and excellent melting qualities. Freshly grated cheese is always preferred over pre-shredded, as it melts more smoothly and prevents a grainy sauce.
- Dijon Mustard: Don’t skip this! A small amount of Dijon mustard doesn’t make the mac and cheese taste like mustard; instead, it’s a culinary secret weapon that enhances the cheese flavor, making it brighter and more complex. If you don’t have Dijon, yellow mustard can be used in a pinch, though the flavor profile will be slightly different.
- Flavorful Seasonings: Paprika, garlic powder, and onion powder are the foundational spices that build a deep, savory base for your cheese sauce. For those who enjoy a little heat, a pinch of cayenne pepper or a dash of hot sauce can be added to give your mini mac and cheese a delightful spicy kick.
- Delicious Toppings: These are where you can truly personalize your mac and cheese bites! Crispy bacon bits add a smoky, salty crunch that perfectly complements the creamy pasta. Fresh chives or finely chopped fresh parsley offer a burst of freshness and a vibrant color contrast. Consider a sprinkle of panko breadcrumbs for an extra layer of crispiness!
Step-by-Step Guide to Baking Perfect Mini Macaroni Cups
Creating these delightful mini mac and cheese cups is a straightforward process, but a few key steps ensure they turn out perfectly golden, crispy, and incredibly delicious every time. Follow this detailed guide for success!
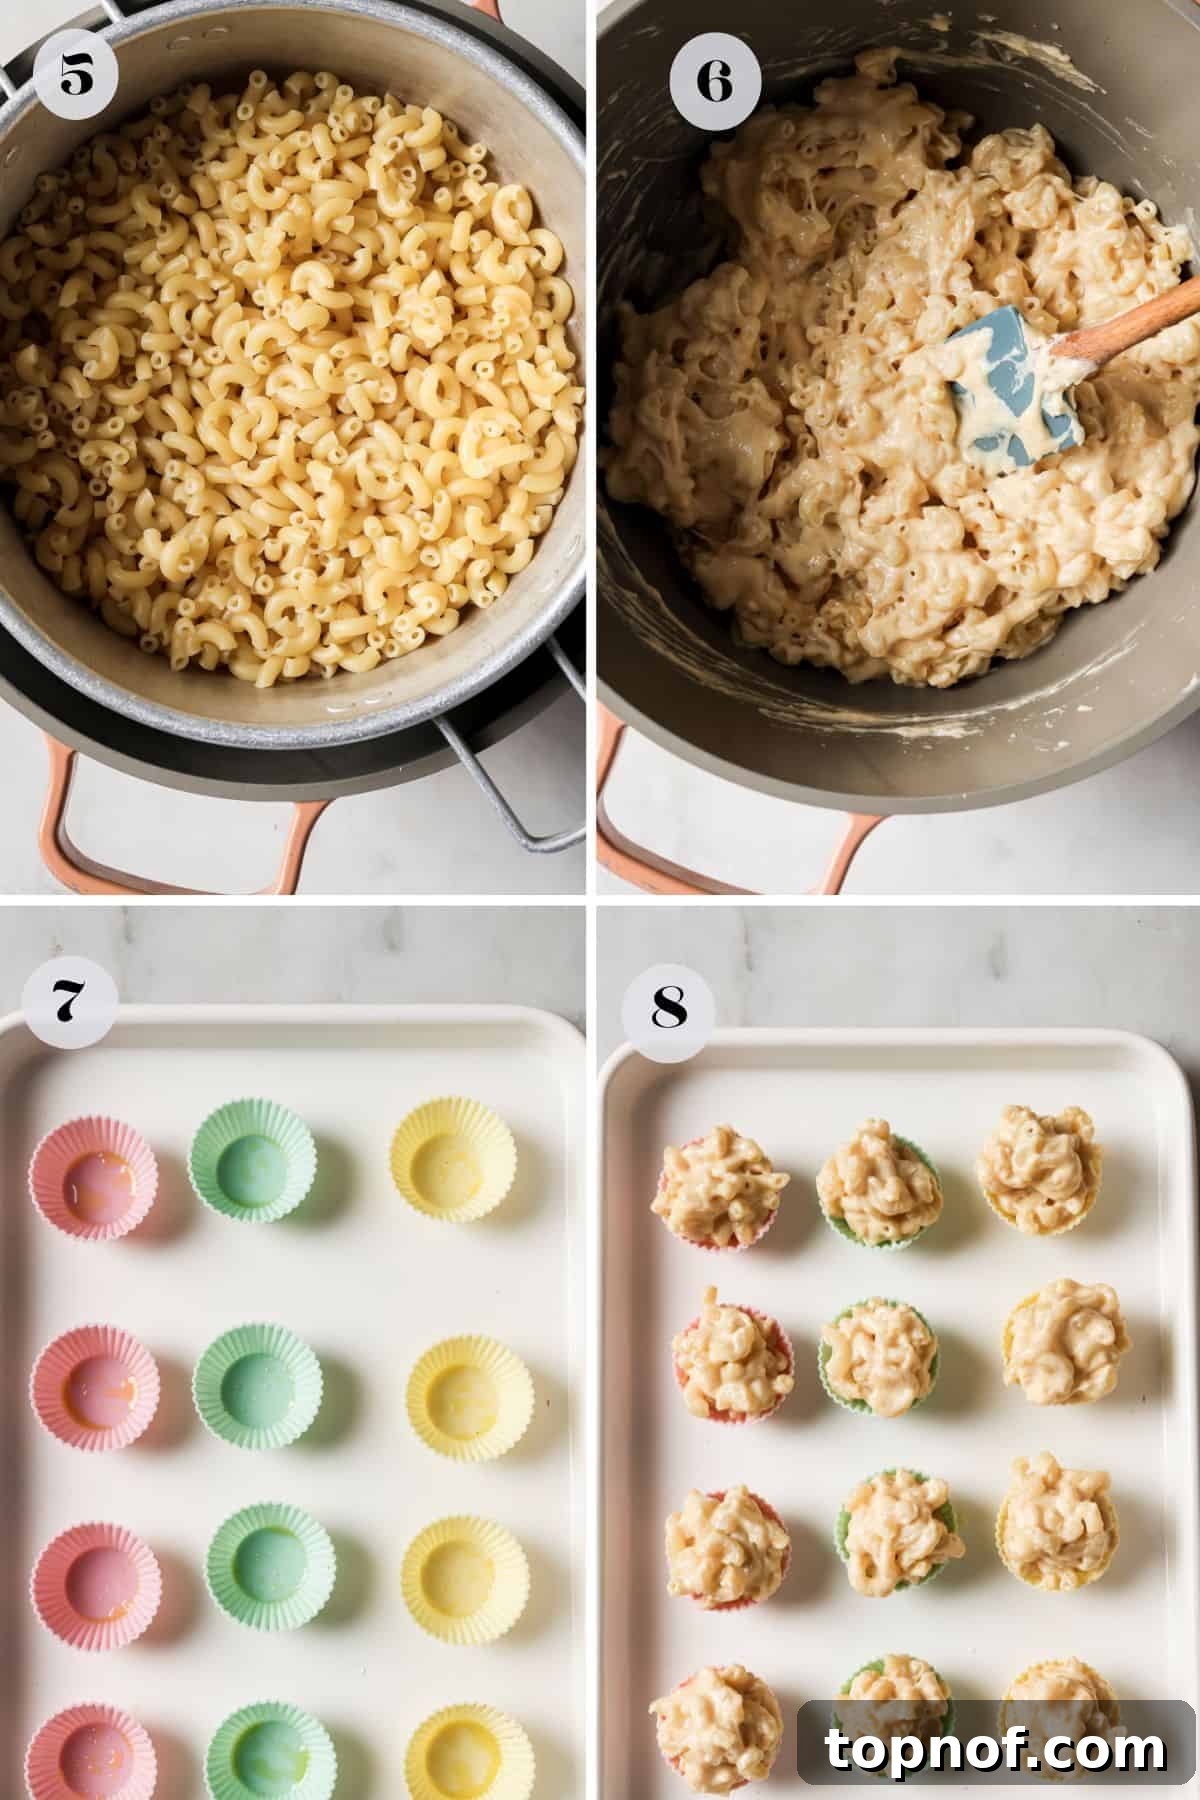
- Prepare Your Muffin Pan: Begin by preheating your oven to 400°F (200°C). Crucially, grease a non-stick mini muffin pan thoroughly with cooking spray. If you’re using a silicone mold, greasing is still recommended for easy removal. A well-greased pan is essential to prevent sticking and ensure your beautiful mac and cheese cups pop out effortlessly.
- Cook the Pasta Al Dente: Bring a large pot of generously salted water to a rolling boil over high heat. Add your elbow macaroni and cook it for 1-2 minutes LESS than the package directions suggest. For instance, if the package says 9 minutes, cook for 7 minutes. This “al dente” approach is vital; the pasta will continue to cook in the oven, and slightly undercooked pasta will hold its shape better and prevent your bites from becoming mushy. Drain and rinse the pasta immediately after cooking to stop the cooking process.
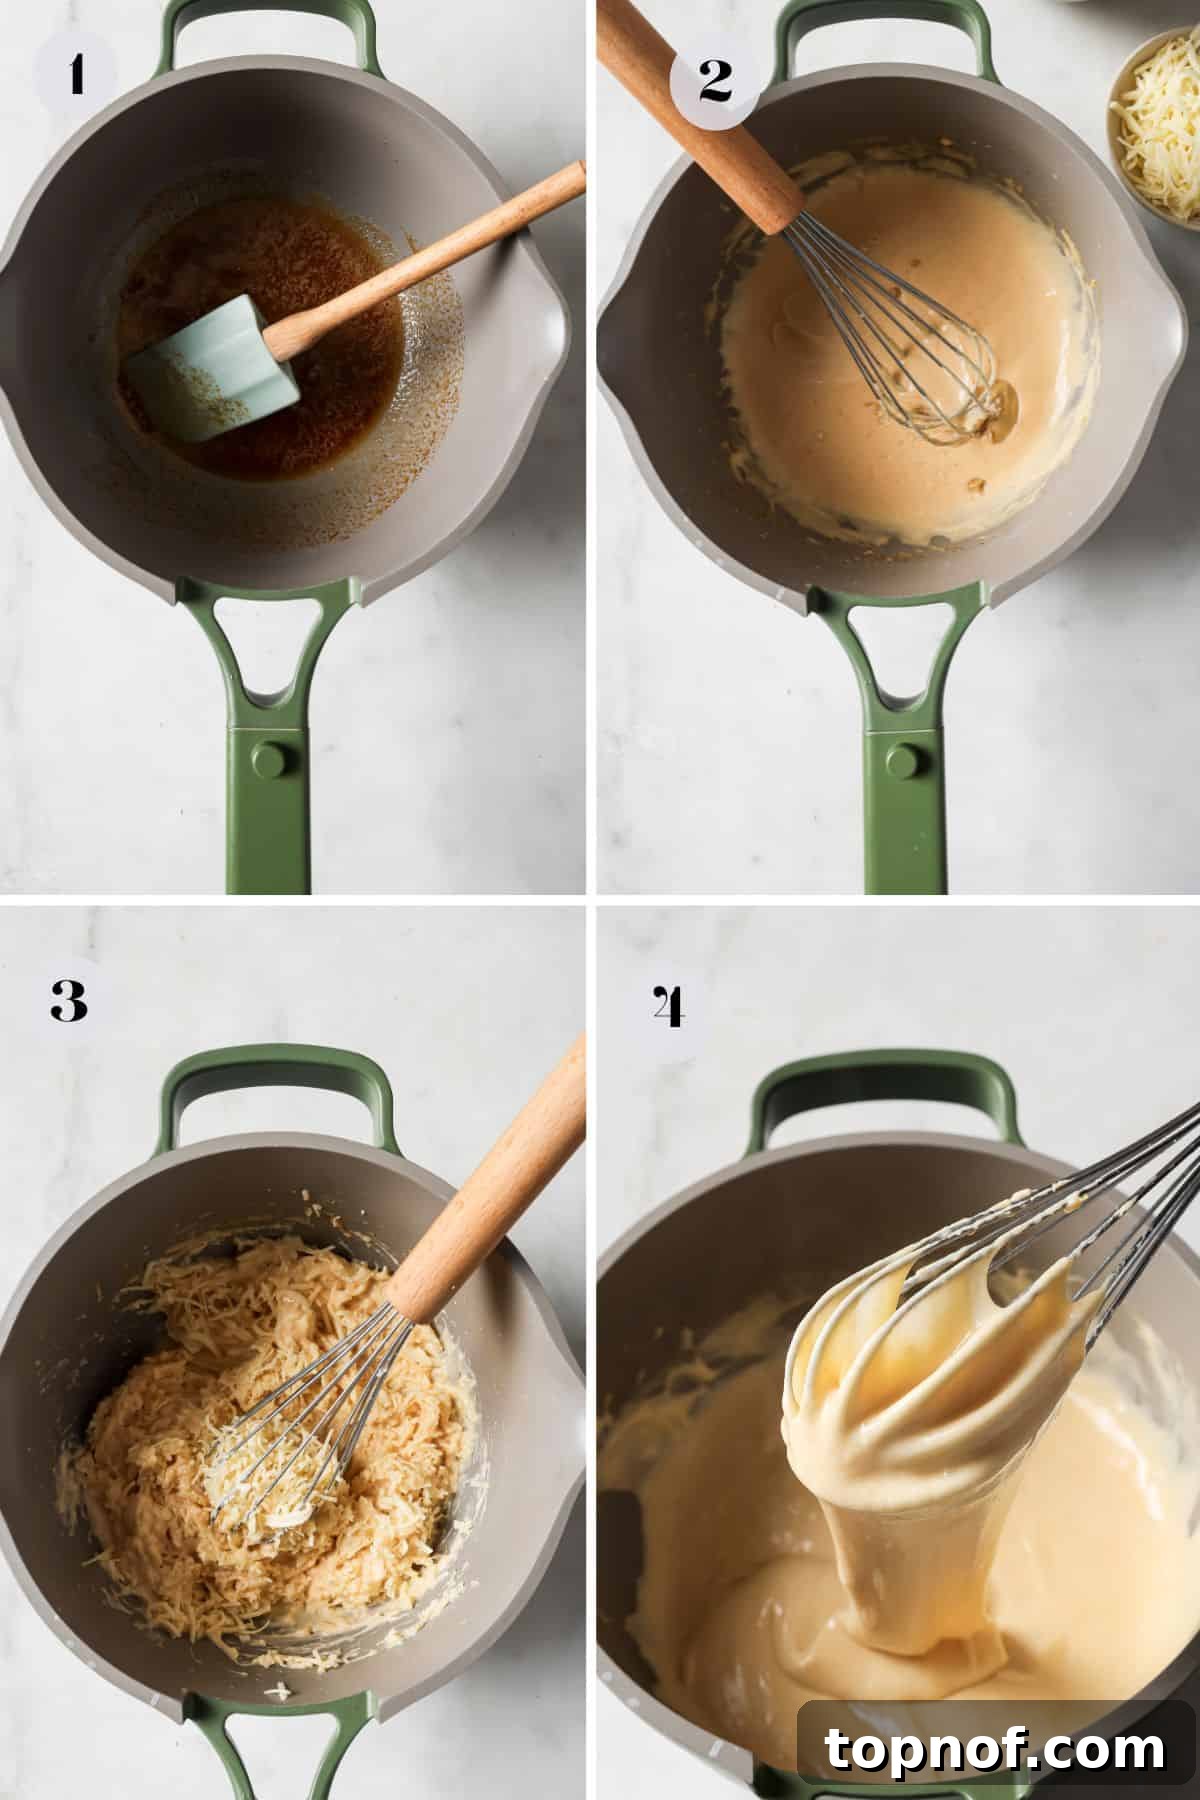
- Start the Roux and Seasonings: In a large, heavy-bottomed saucepan or Dutch oven, melt the butter over medium heat. Once the butter is melted and slightly foamy, remove the pan from the heat. Stir in the smoked paprika, garlic powder, onion powder, and Dijon mustard. The residual heat will bloom the spices, enhancing their flavor.
- Create the Roux: Return the saucepan to medium heat. Add the all-purpose flour to the butter and spice mixture. Using a hand balloon whisk, stir continuously for about 30 seconds. You’re aiming for a smooth, pale paste (the roux). This cooks out the raw flour taste and forms the thickening base for your sauce.
- Whisk in the Milk: Gradually drizzle in the whole milk, whisking constantly and vigorously to prevent any lumps from forming. Keep stirring on the heat for about 1 minute, or until the mixture begins to thicken and coats the back of a spoon. The sauce should be smooth and consistent.
- Melt the Cheeses: Reduce the heat to low. Add your grated sharp cheddar (or Gruyère) and shredded mozzarella cheeses to the thickened milk mixture. Stir continuously until the cheeses are completely melted and you have a smooth, velvety cheese sauce. It will be quite thick, which is exactly what we want for these sturdy bites!
- Reserve Sauce for Drizzling: Once your cheese sauce is perfectly smooth, carefully spoon out about 1/4 cup of the sauce and set it aside. This reserved sauce will be thinned out later to create a luscious drizzle for serving.
- Combine Pasta and Sauce: Add the pre-cooked, drained pasta directly into the saucepan with the thick cheese sauce. Stir everything together thoroughly, ensuring every piece of macaroni is generously coated with the creamy, cheesy goodness.
- Fill and Pack the Muffin Cups: Using a spoon, carefully scoop the mac and cheese mixture into each well of your prepared mini muffin pan. It’s crucial to pack the mixture down firmly into each cup using the back of your spoon or a small measuring spoon. This step helps the bites hold their shape beautifully after baking.
- Bake to Golden Perfection: Transfer the muffin pan to your preheated oven and bake for approximately 12 minutes. You’ll know they’re ready when the edges are bubbling, the tops are slightly golden, and they look deliciously gooey.
- Cool and Release: Once baked, remove the pan from the oven. Resist the urge to immediately remove them! Allow the mini mac and cheese cups to cool in the pan for at least 5-10 minutes. This cooling period is critical as it allows them to firm up and set their shape. After cooling, carefully run a thin knife or toothpick around the edges of each cup, then gently lift and remove them.
- Prepare and Drizzle the Reserved Sauce: While the cups are cooling, take your reserved 1/4 cup of cheese sauce. Place it back into a small saucepan with 1-2 tablespoons of additional milk. Heat gently over low heat, stirring constantly, until the sauce becomes thinner and a perfect consistency for drizzling.
- Garnish and Serve: Arrange your golden mini macaroni cups on a serving platter. Generously top them with crispy crumbled bacon, fresh chopped chives, and an optional drizzle of the warmed, thinned cheese sauce for an extra touch of indulgence. Serve warm and watch them disappear!
Expert Tips for Flawless Mac & Cheese Bites
Achieving perfectly structured, flavorful, and irresistibly crispy mini mac and cheese bites is simple with these insider tips:
- Master the Al Dente Pasta: As mentioned in the instructions, cooking your macaroni 1-2 minutes less than the package directs is non-negotiable. This ensures the pasta retains a slight bite and doesn’t become overcooked or mushy during the secondary baking process. It’s the secret to bites that hold their form.
- Pack It In Tightly: After combining the pasta and sauce, don’t just gently spoon it into the muffin cups. Use the back of a spoon, a small measuring cup, or even your clean fingers to firmly press the mixture down into each well. This compression is key to forming sturdy, intact mac and cheese cups that won’t crumble when removed.
- Embrace the Crunchy Topping: For an extra layer of texture and visual appeal, consider adding a crunchy topping before baking. A sprinkle of panko breadcrumbs will crisp up beautifully, giving you that satisfying golden crunch. You can also mix in crushed crackers or even a little extra grated Parmesan cheese on top for a richer, crisper crust.
- The Patience of Cooling is Key: It’s tempting to pull them out of the pan immediately, but resist! Allowing the mini macaroni cups to cool in the pan for at least 5-10 minutes post-baking gives the cheese a chance to set and firm up. This crucial step prevents them from falling apart when you try to remove them, ensuring perfectly shaped bites.
- Consider Silicone Molds: If you frequently make these or similar baked goods, investing in a silicone mini muffin mold can make removal even easier. Their flexible nature allows for effortless popping out of each cup.
- Seasoning is Your Friend: Don’t be shy with seasoning. Taste your cheese sauce before combining with the pasta and adjust salt, pepper, or other spices as needed. Remember, pasta absorbs seasoning, so a well-seasoned sauce is essential.
Customization and Flavor Variations
While the classic mini mac and cheese bite is a masterpiece on its own, its versatility allows for endless creative twists. Transform your bites into gourmet appetizers or exciting themed snacks with these delicious mix-in and topping ideas:
- Smoky Bacon & Jalapeño: Incorporate crispy crumbled bacon into the mac and cheese mixture before baking. For a spicy kick, add finely diced fresh or pickled jalapeños. A sprinkle of extra cheddar on top before baking creates a delicious crust.
- Buffalo Chicken Mac Bites: Mix shredded cooked chicken breast tossed in buffalo sauce into your mac and cheese. Top with a crumble of blue cheese before baking for that authentic buffalo flavor profile.
- Caramelized Onion & Mushroom: Sauté finely sliced onions until deeply caramelized, then add sautéed mushrooms. Fold these savory additions into the cheese and pasta mixture for an earthy, sweet, and rich flavor.
- Spinach & Artichoke: Channel the popular dip! Mix in thawed, squeezed dry chopped spinach and finely chopped artichoke hearts. A dash of nutmeg can enhance this creamy combination.
- Herb Garden Freshness: For a lighter, aromatic touch, fold in a generous amount of fresh chopped herbs like parsley, chives, thyme, or rosemary. These add brightness and complexity.
- Gourmet Lobster Mac: For a truly decadent appetizer, fold in cooked, chopped lobster meat. This transforms your mini mac into an impressive, high-end treat perfect for special occasions.
- Sun-Dried Tomato & Basil: Add finely chopped oil-packed sun-dried tomatoes (drained) and fresh basil for a Mediterranean-inspired flavor. A sprinkle of Parmesan can elevate this further.
- Broccoli & Cheddar: A classic pairing! Finely chopped steamed broccoli florets mixed into the mac and cheese offer a subtle vegetable inclusion and extra texture.
Serving Suggestions for Every Occasion
These mini mac and cheese bites are incredibly versatile and can be served in a multitude of ways, making them perfect for almost any event. Here are some ideas to inspire your next gathering:
- Appetizer Extravaganza: Arrange them beautifully on a platter with a selection of dipping sauces like sriracha aioli, ranch, or extra thinned cheese sauce. They pair wonderfully with other finger foods like mini quiches, spring rolls, or sliders.
- Game Day & Party Platter: Serve them alongside chicken wings, nachos, and loaded potato skins for the ultimate game day spread. Their bite-sized nature means less mess and more cheering!
- Kid-Friendly Favorite: Children adore these! Offer them as a fun and nutritious (shhh, don’t tell them it has milk!) snack or as a side dish for lunch or dinner. They’re easy for small hands to manage.
- Elegant Brunch Addition: Elevate your brunch spread by including these savory bites. They complement egg dishes, fruit platters, and pastries beautifully, adding a comforting touch.
- Delectable Side Dish: Beyond appetizers, these cups make an excellent side to grilled chicken, roasted vegetables, or a simple green salad. They add a comforting and familiar element to any meal.
- Holiday Feast Accent: During the holidays, they can serve as a unique and charming side dish that stands out from traditional offerings, providing a fun alternative to classic baked mac and cheese.
Storage and Reheating Tips
One of the many benefits of these mini mac and cheese cups is their make-ahead and leftover-friendly nature. Here’s how to store and reheat them to maintain their deliciousness and crispy texture:
- Refrigeration: Store any leftover mini mac and cheese cups in an airtight container in the refrigerator for up to 3-4 days. Ensure they are completely cooled before storing to prevent condensation.
- Freezing for Later: These bites freeze exceptionally well! Once completely cooled, arrange them in a single layer on a baking sheet and freeze until solid (about 1-2 hours). Transfer the frozen cups to a freezer-safe bag or airtight container. They can be stored in the freezer for up to 2-3 months. Thaw overnight in the refrigerator before reheating, or reheat directly from frozen (this may require a slightly longer cooking time).
- Oven Reheating (Recommended): For the best results, especially if you want to restore that desirable crispy exterior, reheat the mini mac and cheese cups in the oven. Preheat your oven to 350°F (175°C). Place the cups on a baking sheet and heat for 8-12 minutes, or until warmed through and the cheese is bubbly. If reheating from frozen, increase the time to 15-20 minutes.
- Air Fryer Reheating (Quick & Crispy): An air fryer is a fantastic tool for reheating these bites, giving them an extra crispy finish. Place them in a single layer in your air fryer basket and heat at 350°F (175°C) for 3-5 minutes, or until hot and crispy. Monitor closely to prevent burning.
- Microwave Reheating (Quick but Less Crispy): While the microwave is the fastest option, it won’t yield the same crispy texture. Heat for 30-60 seconds per cup, or until warmed through. This method is best if you’re prioritizing speed over crispiness.
Recipe FAQs
While a muffin tin is highly recommended for achieving their signature cup shape and ensuring they hold together, you do have alternatives. You can try using individual ramekins, which will result in larger, more casserole-like portions. Alternatively, you can shape the mac and cheese mixture by hand into small patties or balls and bake them on a parchment-lined baking sheet. Be aware that these might not hold their shape as uniformly or have the same crispy edges as those baked in a muffin tin.
The possibilities are truly endless! Get creative and customize your mini mac and cheese bites with various flavorful additions. Popular choices include crumbled crispy bacon, sautéed caramelized onions, finely diced fresh or pickled jalapeños for a kick, cooked and finely chopped spinach or broccoli, sun-dried tomatoes, or even a sophisticated touch like cooked lobster meat for a gourmet version. Don’t forget crunchy toppings like panko breadcrumbs or extra grated Parmesan cheese for added texture.
To achieve maximum crispiness, there are a few tricks. First, ensure your muffin tin is well-greased. Second, consider pre-baking the empty cups of mac and cheese for 5-7 minutes before adding any delicate toppings, then add toppings and finish baking. Lastly, a generous sprinkle of panko breadcrumbs mixed with a little melted butter or olive oil on top before baking will yield a wonderfully golden and crispy crust. Baking at a slightly higher temperature for the last few minutes can also help, but watch carefully to prevent burning.
Yes, you absolutely can! The cheese sauce can be made a day in advance and stored in an airtight container in the refrigerator. When ready to use, gently reheat it over low heat, stirring frequently, and add a splash of milk if needed to loosen it back to a creamy consistency before combining with the pasta.
Other Macaroni Recipes To Try
Side Dishes
Spicy Mac And Cheese
Dinner
BBQ Chicken Mac and Cheese
Side Dishes
Chicken Macaroni Pasta Salad
Side Dishes
BLT Pasta Salad
If you loved this recipe, please let us know by leaving a comment below! For even more delicious and inspiring recipes to make you feel good from the inside out, be sure to follow us on Instagram and Pinterest. Your support means the world – thanks for being here!

★★★★★
Baked Mini Macaroni Cups
Bailey Rhatigan
Delight in these mini macaroni and cheese cups, featuring a creamy cheese sauce, bacon bits, and perfectly cooked pasta. These little bites are easy to make and perfect as an appetizer or snack!
10 mins
10 mins
20 mins
24 cups
Pin Recipe
Rate Recipe
Print Recipe
Ingredients
Garnish
Instructions
- Preheat the oven to 400°F (200°C) and generously grease a non-stick mini muffin pan or use a silicone mold with non-stick cooking spray.
- Bring a large pot of salted water to a boil. Add the elbow macaroni and cook for 1-2 minutes LESS than the package directions (e.g., if package says 9 mins, cook for 7 mins). Drain and rinse immediately to stop cooking.
- In a large saucepan, melt 2 tbsp butter over medium heat. Remove from heat and stir in the paprika, garlic powder, onion powder, and Dijon mustard.
- Return to medium heat, add 2 tbsp flour, and whisk continuously for about 30 seconds to create a smooth roux.
- Gradually drizzle in 1⅛ cup whole milk, whisking constantly until the mixture thickens and is smooth, about 1 minute.
- Reduce heat to low. Add the grated sharp cheddar and shredded mozzarella. Stir until completely melted and the sauce is smooth and thick. Reserve ¼ cup of this cheese sauce for drizzling later.
- Add the drained pasta to the saucepan with the cheese sauce. Stir well to ensure all pasta is evenly coated.
- Spoon the mac and cheese mixture into the prepared muffin cups. Firmly pack the mixture down into each cup using the back of a spoon.
- Bake for 12 minutes, or until bubbling, slightly gooey, and golden on top.
- Allow to cool in the pan for 5-10 minutes to firm up before carefully running a toothpick or thin knife around the edges and removing them.
- In a small pan, combine the reserved ¼ cup sauce with 1-2 tbsp extra milk. Heat gently until runny and warm.
- Top the mini macaroni cups with chopped chives, crumbled bacon, and an optional drizzle of the thinned cheese sauce. Serve warm.
Notes
- Al Dente Pasta is Key: Undercooking the pasta slightly ensures it holds its shape and doesn’t get mushy when baked.
- Pack it Firmly: Use the back of a spoon or a measuring cup to pack the macaroni mixture tightly in the muffin cups so they don’t fall apart.
- Crunchy Topping Option: Sprinkle panko breadcrumbs or extra grated cheese on top before baking for a golden, crispy finish.
- Cooling Time Matters: Let the mini macaroni cups sit for at least 5-10 minutes after baking to set. This helps them hold their shape when removed.
- Storage: Store leftovers in an airtight container in the refrigerator for up to 4 days.
- Reheating: For best crispiness, reheat in the oven or air fryer at 350°F (175°C) for 3-8 minutes, or until warmed through. Microwaving is faster but may result in less crispiness.
Nutrition
Carbohydrates: 8g |
Protein: 4g |
Fat: 5g |
Saturated Fat: 3g |
Polyunsaturated Fat: 0.3g |
Monounsaturated Fat: 1g |
Trans Fat: 0.04g |
Cholesterol: 14mg |
Sodium: 97mg |
Potassium: 56mg |
Fiber: 0.4g |
Sugar: 1g |
Vitamin A: 149 IU |
Vitamin C: 0.1mg |
Calcium: 79mg |
Iron: 0.2mg
Nutrition information is automatically calculated and should only be used as an approximation.
Additional Info
Bailey Rhatigan
10 minutes
10 minutes
20 minutes
Appetizer, Snack
American
24 cups
96
macaroni and cheese bites, macaroni cups, mini macaroni
Like this recipe? Leave a comment below!